Video Game Hacking and Kernel Level Anti-Cheat Bypassing
Like many people in today's world, I grew up playing video games. A big part of why I study Cybersecurity today has to do with video games. I grew up a curious child, so when I ran into a video game hacker while playing video games, I always wondered how they do it. The majority of people pay for their cheats that are coded by professional reverse engineers and coders. They do this for an advantage or to have more power, but I cheated games to understand how the "hacking" part was done so I can feed my curiosity. For the past year, I kept on researching and going through source codes of different cheats/hacks, researching how Anti-Cheats work to attempt to bypass them, until I was able to put together my own cheats for whatever video game I wanted. When I was just 11 years old, I started off with jailbreaking my PlayStation and my iPhone to do whatever I wanted on the games I played. At the time, I would use other people's tools. Today, I am proud to say that I came a long way in terms of my understanding, and deeply understand how video game cheats work, what needs to be done in memory, how to reverse engineer and find the right functions or offsets needed, and how video game cheats are detected.
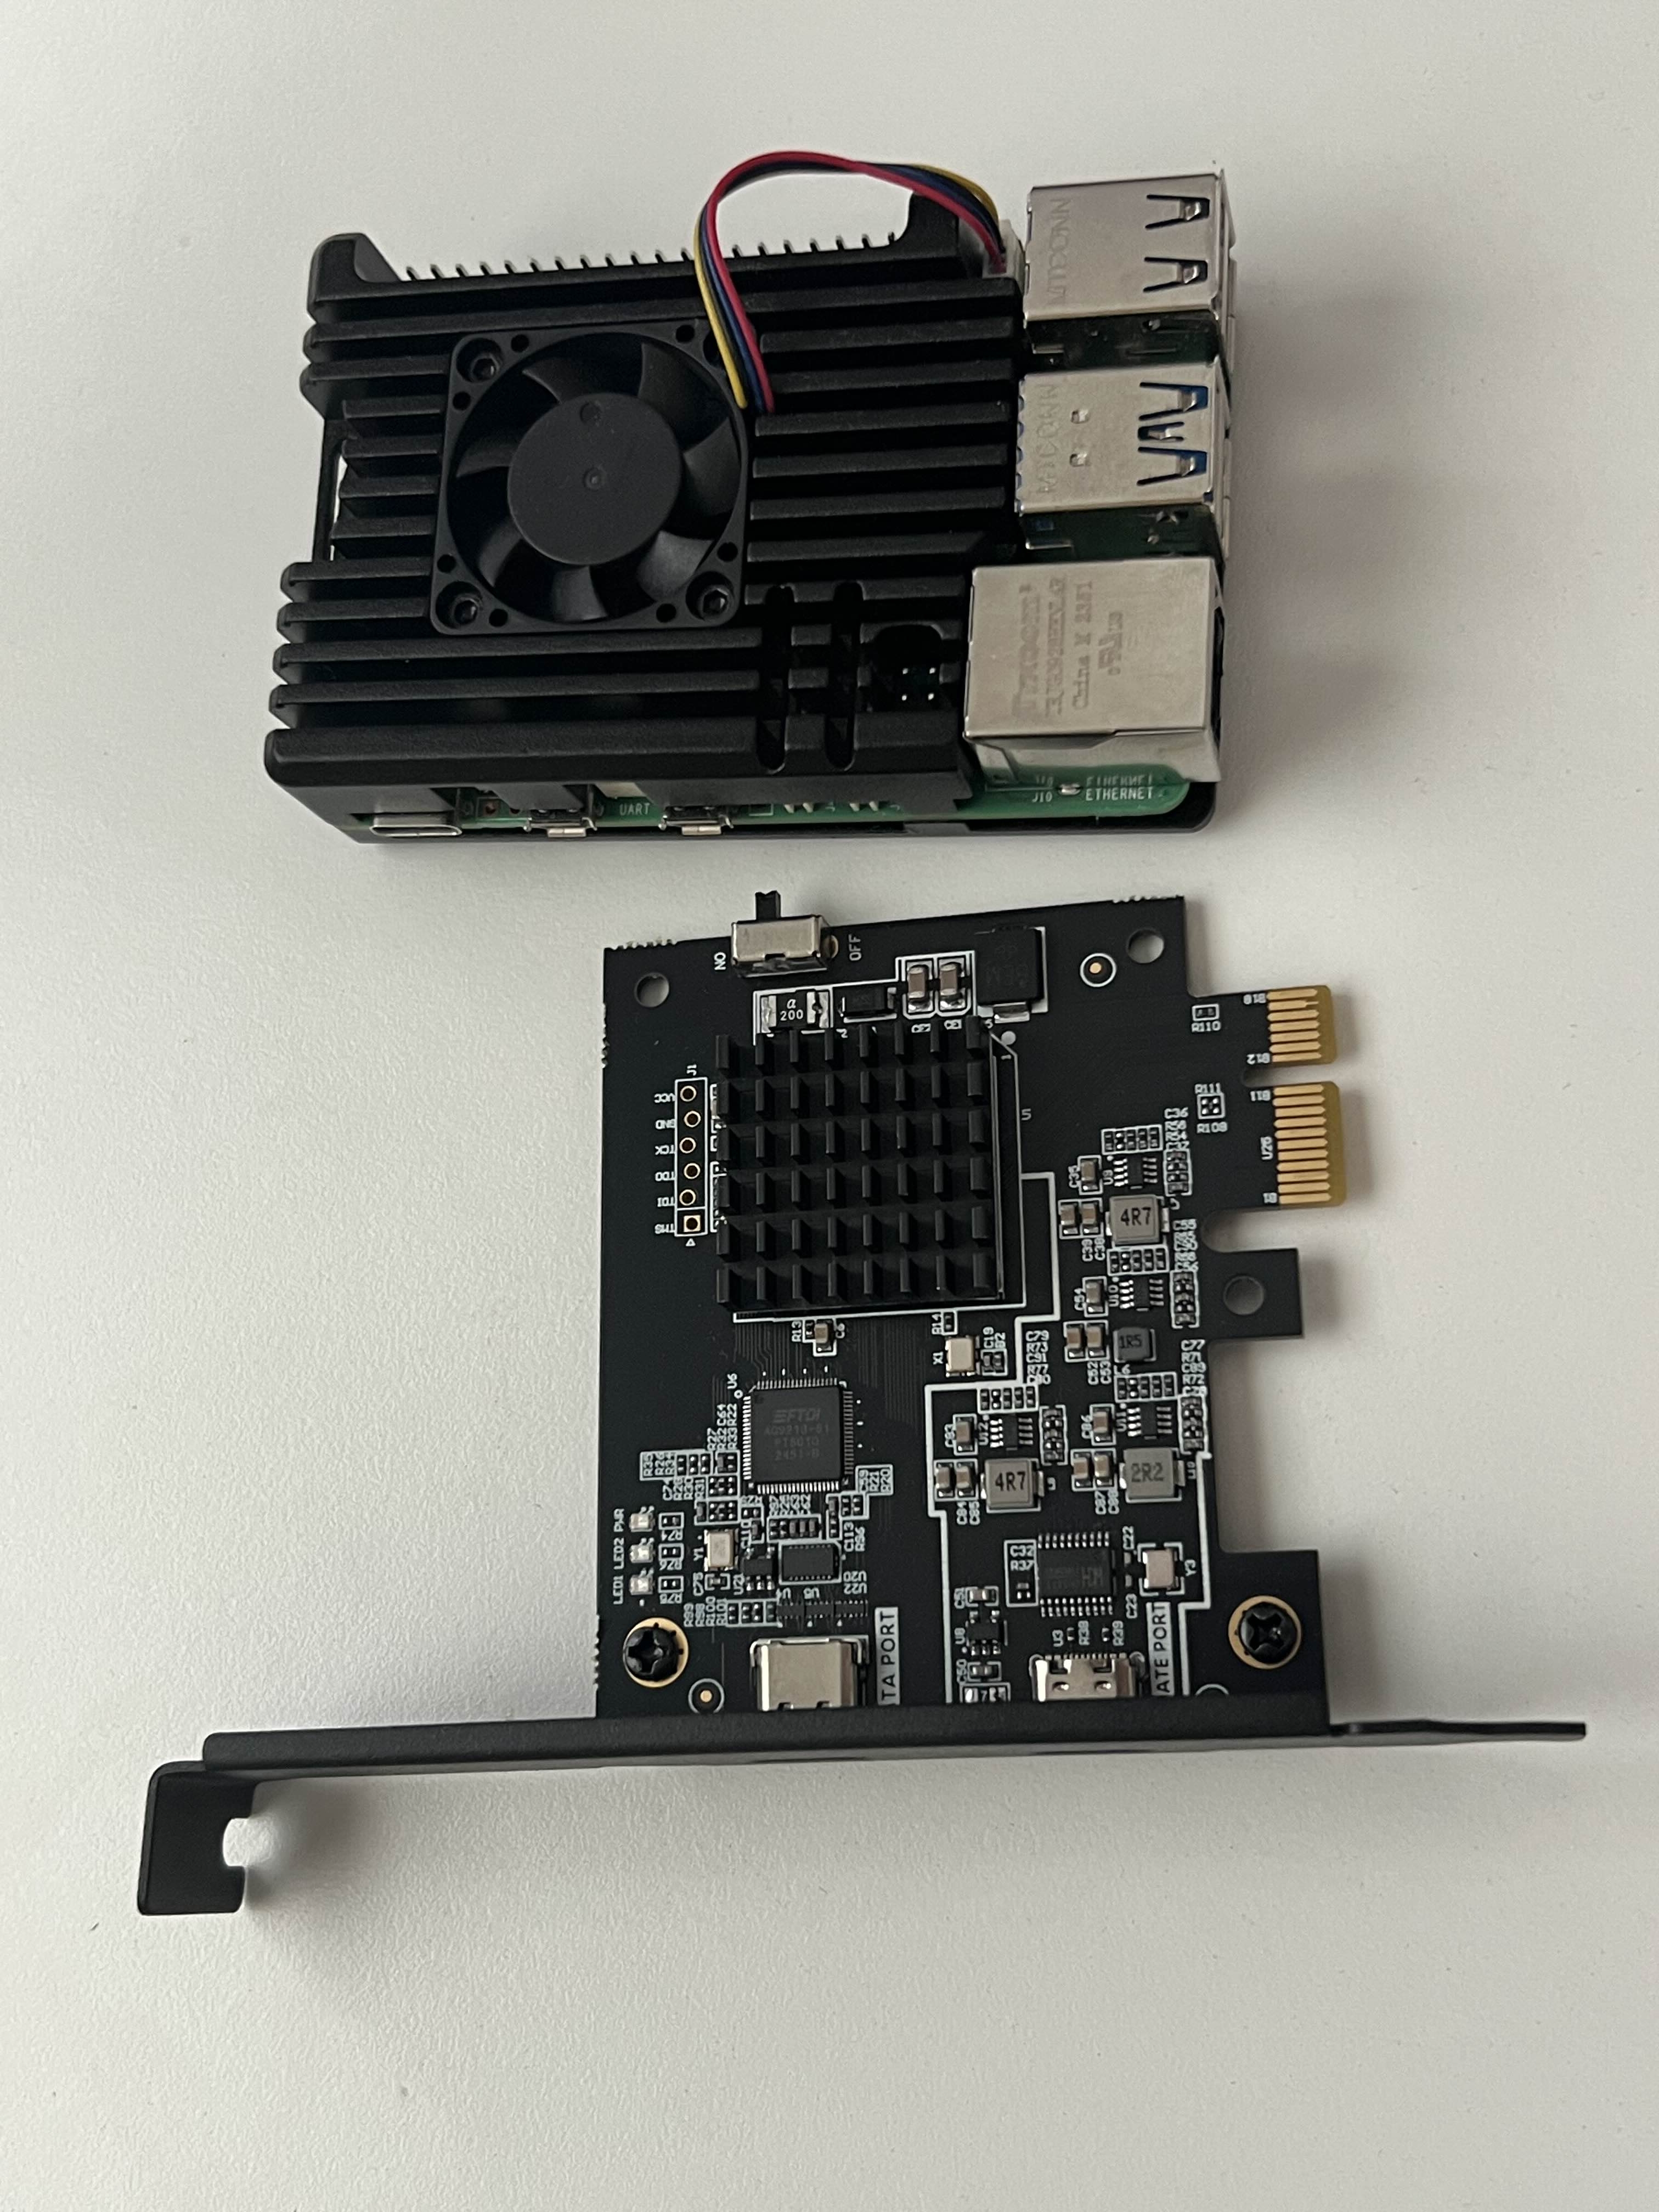
Using Direct Memory Access Cards
Direct Memory Access (DMA) is a hardware feature that allows certain devices to read from or write to system memory without involving the CPU for every data transfer.
In my case, the Direct Memory Access card is put in one of my motherboard's PCIe slots on the machine that runs the program (the video game). Using a USB-C cable, the DMA card is connected to the Raspberry Pi where the memory is read and written to. (where the cheat runs)
From a defensive or forensic standpoint, DMA is interesting because:
- It can inspect or snapshot memory even if the operating system is locked, crashed, or protected by kernel-level defenses.
- Security researchers and forensic analysts use specialized DMA hardware to capture live memory safely and analyze system state.
- Tools such as MemProcFS which is a popular option for this case, use DMA interfaces to read physical memory externally, allowing researchers to study what’s happening inside a system without installing agents or tampering with kernel modules.
From an offensive standpoint:
- Because DMA operates below the OS, it can sometimes bypass kernel protections or kernel anti-cheat drivers if not properly secured.
- This is why modern operating systems and hardware implement defenses like IOMMU (Input-Output Memory Management Unit) — it acts like a firewall between devices and memory, ensuring only authorized DMA devices can access specific regions. For video game cheats, these might need to be disabled in the BIOS.
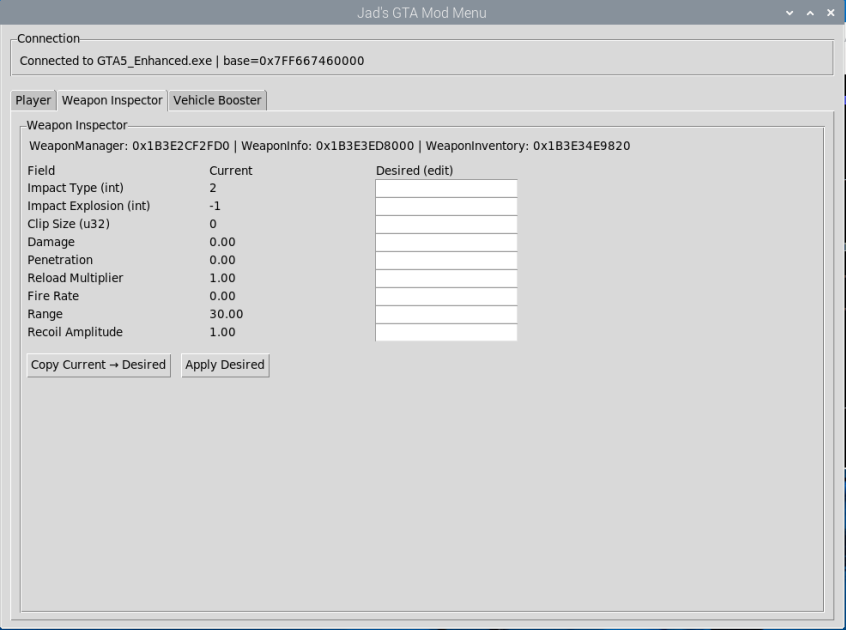
Reverse engineering approach
My workflow combined static and dynamic reverse engineering:
- Static reverse engineering: IDA Pro to scan the binary for unique instruction sequences, string references, and data structures.
- Dynamic reverse engineering: Cheat Engine is used to dynamically analyze memory. An example is purposely decreasing health, and repeatedly searching for changes in memory to find where in memory the value is stored.
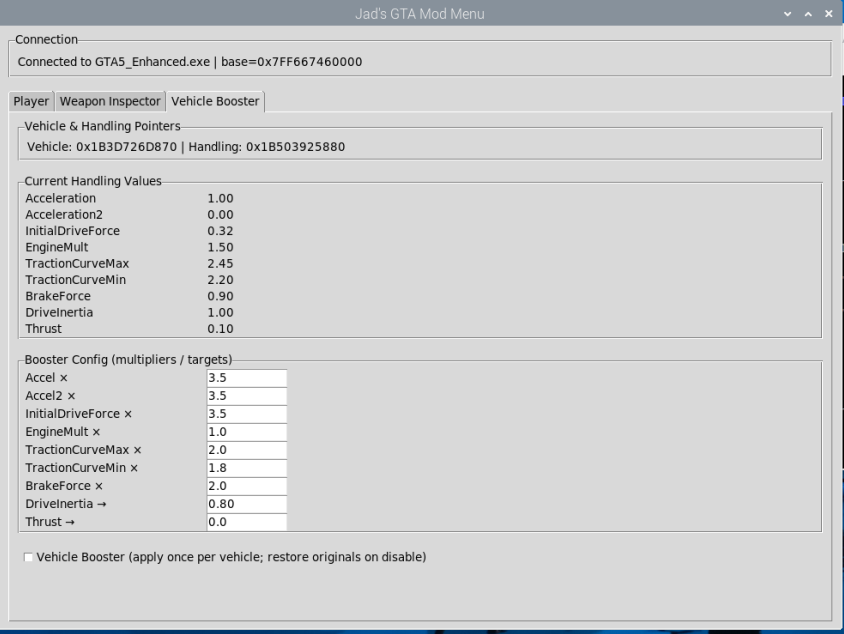
- Offset strategy: Because this project is an external cheat, fixed offsets are the primary mechanism to resolve fields (the code uses module-base + known offsets). This keeps the runtime logic simple and reliable for the target build used.
- Validation & safety: write-read validation loops are used where writes occur (for example, the teleport routine writes navigation coordinates then reads them back and checks distance from the start to guard against failed writes). These checks are the main safety net that avoids destructive changes and reduces false positives.
- Future work (signatures): I plan to extract signatures for offsets that change on every build. This work is ongoing.
- Tooling summary: IDA Pro for static analysis; Cheat Engine and memprocfs for runtime reads/writes; custom Python resolver code (project source) that implements the read/write and validation logic.
Defensive takeaway
Modern systems mitigate DMA abuse through:
- IOMMU (VT-d / AMD-Vi) — restricts which memory addresses devices can access.
- Driver signing and enforcement — prevents rogue kernel drivers that expose DMA-like access.
- Memory isolation — segmentation that ensures sensitive regions (e.g., credential stores, kernel space) can’t be DMA-mapped.
- Behavioral detection — monitoring for unusual DMA or PCIe activity patterns.
Code explanation
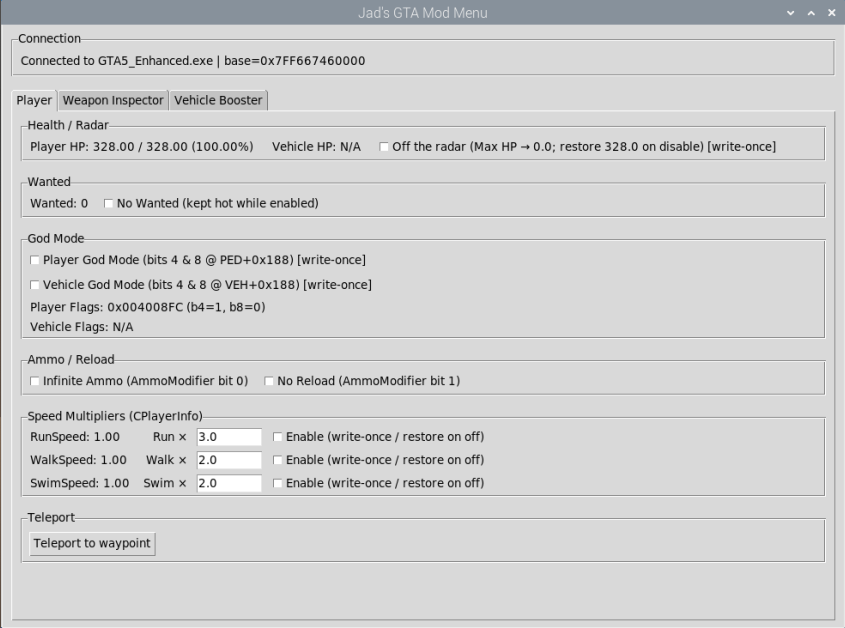
1) Reading player health
def read_player_health(self):
    with self.lock:
        if not self.ped: return (float("nan"), float("nan"))
        hp  = read_f32(self.proc, self.ped + PED__CURR_HP_OFF)
        mx  = read_f32(self.proc, self.ped + PED__MAX_HP_OFF)
        return hp, mx
What this does: reads two floats from the resolved player object: current HP and max HP, and returns them to the UI so it can show a live health readout. The function takes a lock to avoid concurrent reads/writes and uses typed reads (`read_f32`) that translate raw bytes to floats.
2) Toggling player god flags
def set_player_god(self, enable: bool) -> bool:
    with self.lock:
        if not self.ped: return False
        addr = self.ped + PED__GODFLAGS_OFF
        cur = read_u32(self.proc, addr, default=None)
        if cur is None: return False
        newv = (cur | GOD_BITMASK) if enable else (cur & ~GOD_BITMASK)
        if newv != cur:
            write_u32(self.proc, addr, newv)
        return True
What this does: reads the 32-bit flags word at the player's flags field, sets or clears the two god-mode bits, and writes the new value back. The write is gated by a lock and a simple compare so the write is only performed if needed; the UI shows current flag bits for transparency. This is how the UI "apply player god" toggle is implemented.
3) Teleporting to waypoint
def teleport_to_waypoint_validated(self, attempts: int = 20, sleep_ms: int = 15):
    if not self.ped:
        return False, "Local CPed not resolved."
    nav_ped = self._nav_ptr(self.ped)
    if not nav_ped:
        return False, "Player CNavigation* is null."

    xyz = self._find_waypoint_xyz()
    if not xyz:
        return False, "Waypoint not found. Make sure one is set."
    tx, ty, tz = xyz

    start = self._read_nav_pos(nav_ped)
    if not start:
        return False, "Failed to read starting position."
    sx, sy, sz = start

    for _ in range(max(1, int(attempts))):
        try:
            write_f32(self.proc, nav_ped + NAV_POS_X, tx)
            write_f32(self.proc, nav_ped + NAV_POS_Y, ty)
            write_f32(self.proc, nav_ped + NAV_POS_Z, tz)
            if self.vehicle:
                nav_veh = self._nav_ptr(self.vehicle)
                if nav_veh:
                    write_f32(self.proc, nav_veh + NAV_POS_X, tx)
                    write_f32(self.proc, nav_veh + NAV_POS_Y, ty)
                    write_f32(self.proc, nav_veh + NAV_POS_Z, tz)
        except Exception:
            time.sleep(max(0, sleep_ms) / 1000.0)
            continue

        time.sleep(max(0, sleep_ms) / 1000.0)
        cur = self._read_nav_pos(nav_ped)
        if not cur:
            continue
        cx, cy, cz = cur

        ds = math.dist((cx,cy,cz), (sx,sy,sz))
        dt = math.dist((cx,cy,cz), (tx,ty,tz))
        if ds > 100.0 and dt < 100.0 and dt > 1.0:
            return True, f"Teleported to ({tx:.2f}, {ty:.2f}, {tz:.2f})"

    return False, "Teleport did not validate (no significant movement)."
What this does: this is a short write-then-validate loop: it writes the desired nav position into the player's navigation struct, waits briefly, reads back the nav position, and checks two distances (movement from start, proximity to target) to determine success. This validation reduces false positives (for example, writes that appear to "stick" in memory but don't result in actual movement in the runtime).
full code (over 1000 lines) can be requested
What I learned
- Static + dynamic toolchain: I used IDA Pro for static analysis and Cheat Engine for live inspection. Combining both made it possible to find stable offsets in the target process.
- How cheats are detected: Anti-cheats lean on a mix of sensors: they watch for unsigned modules or drivers, any injections into the game process, memory reads, and suspicious API calls such as WriteProcessMemory. Knowing these detection signals shaped which behaviors I used.
- Simple CS fundamentals matter: Concepts from class — e.g., loops, appear frequently in real cheat code.
- Performance matters in practice: Small implementation choices can dramatically affect stability. I observed that repeated writes to keep a feature on quickly or looping through excess and useless mempory degrades responsiveness and slows all machines involved; optimizing reads and using validation loops that minimize I/O improved stability.
- Validation is critical: validating that a write took effect (read-back checks and simple sanity/range checks) reduces accidental mistakes when writing memory which can leads to problems such as crashes.